Welcome to Your First Beginner Lesson for Piano!
 Welcome to Get Piano Lesson 1. Since this will be our first beginner lesson for piano, these initial finger exercises will be relatively simple and not too dramatic.
The goal here is not to look fancy or sound like Billy Joel right away.
The object of this lesson is to focus on keeping good form in your hands, wrists and fingers, and playing the
following exercises correctly.
Check Out this Video and Watch Me Demonstrate a Basic Introduction to the Piano!
Now, if you’ve already read through my “Piano Pattern” and “Get Ready” sections, I want to thank you for being patient this long, but now we’re going to have some fun!
So without further delay, take a comfortable seat in front of your piano keyboard, and we will begin our beginner lesson for piano right now…
Right Hand
Remember that good friend of ours Middle C?
Good, place your right number 1 finger on Middle C.
What’s that? …you’ve already forgotten which finger is number 1?
Okay, I’ll remind you this time… your number 1 finger is your thumb (make sure you use your right thumb).
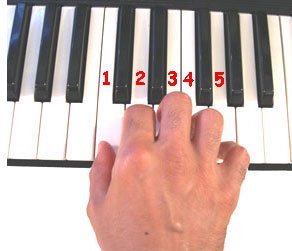 Got your thumb on Middle C? Good, now place your right index finger (number 2) on the white note directly to the right of Middle C.
Next, place your three remaining right fingers on the next three white notes.
You should have all five of your right fingers resting on a white key with your thumb starting on Middle C. Be sure your wrist is up and your fingers are curved.
If you did this correctly your hand position should resemble mine in the example above.
For this beginner lesson for piano, we will call this hand position: “Position Number 1” or “Middle C Position” (as it is commonly known) because our right number 1 finger is starting at Middle C.
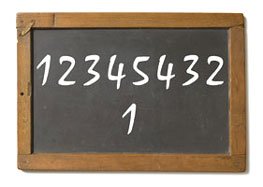
Chalkboard Assignment
Now keep each finger glued to its’ properly assigned key and play the following numbered pattern one finger at a time:
Be sure not to press more than one note down at a time. Release each note before pressing the next one down. Keep your hand position steady and in one place.
 Don’t change the position of your hand or rock back and forth as you play each key. Your fingers are doing all the work here, not your hand.
Some beginners may have trouble with the 3rd and 4th fingers (the middle and the ring fingers), because these fingers are not usually accustomed to working independently of each other.
For this beginner lesson for piano, pay special attention to fingers 3 and 4 as you play them. Notice if you have enough individual control over these two fingers so that they don’t press down at the same time (even for just an instant).
Legato
Again, our goal here in this beginner lesson for piano is to play a simple, smooth and evenly sounding finger pattern. We don’t need thunderous applause at this point.


Each note should be played slowly and evenly connected without any space or pause in between them.
Also the amount of force used to press down on each note should be equal for all five notes, thereby producing the same volume level for each note.
Play this exercise slowly as many times as needed until you can play it perfectly.
Then when you feel you’re getting the hang of it, increase your speed, but keep playing the notes smoothly, accurately and evenly.
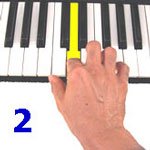
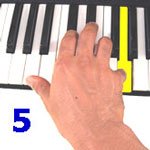
From these images, notice how my hand position stays the same as I play all 5 notes.
Music Terminology:
Whenever you play a group of notes in such an even and steady fashion, (one after the other) with no breaks in between, we call this playing style “legato” in music theory.
You don’t need to memorize the musical jargon at this point. I just thought I’d mention that now, because you will hear the term “legato” again in future beginner lessons for piano.
Still have questions about this legato exercise?
Click the “Play” Button on this Video and let me show you how it’s done…
Staccato
Okay, now we are going to alter our playing style just a bit. One great way to force your fingers to work independently of one another is to play them suddenly, and one at a time.
 For this exercise, we’ll play the same 5-finger pattern as in the first example for our beginner lesson for piano. However, this time we will leave a noticeable pause in between each note as we play them.
Play the notes as though you are quickly striking or stabbing into the keys and quickly retracting your finger upwards after each strike.
Not loudly mind you… just play it with short, controlled bursts. Remember to keep each finger glued to its’ properly assigned key as you go, and try not to tense up. Stay relaxed.
Play this exercise slowly and as many times as needed until you can play each note perfectly individually. When you feel you have got the hang of it, increase your speed while trying to maintain the same level of control.
Music Terminology:
When we play a group of notes with a noticeable break or space in between them, this is known as a “staccato” playing style in music theory.
Again, you don’t need to memorize this right now. But you will hear the term “staccato” later in future beginner lessons for piano.
For the staccato part of our beginner lesson for piano, it’s okay to slightly bounce your hand up and down as you play the keys faster.
Just be sure you’re bouncing from the wrist and not the forearm. Putting a slight bounce in your hand will give you more leverage to strike down on and pull back off the keys at faster speeds.
Sure, I know you’d rather see ME do it instead of just reading about, so…
Check this Video Out and Watch Me Demonstrate
How to Play these Staccato Fingering Exercises!
Welcome to Your First Beginner Lesson for Piano!
 Welcome to Get Piano Lesson 1. Since this will be our first beginner lesson for piano, these initial finger exercises will be relatively simple and not too dramatic.
The goal here is not to look fancy or sound like Billy Joel right away.
The object of this lesson is to focus on keeping good form in your hands, wrists and fingers, and playing the following exercises correctly.
Check Out this Video and Watch Me
Demonstrate a Basic Introduction to the Piano!
Now, if you’ve already read through my “Piano Pattern” and “Get Ready” sections, I want to thank you for being patient this long, but now we’re going to have some fun!
So without further delay, take a comfortable seat in front of your piano keyboard, and we will begin our beginner lesson for piano right now…
Right Hand
Remember that good friend of ours Middle C?
Good, place your right number 1 finger on Middle C.
What’s that? …you’ve already forgotten which finger is number 1?
Okay, I’ll remind you this time… your number 1 finger is your thumb (make sure you use your right thumb).
Got your thumb on Middle C? Good, now place your right index finger (number 2) on the white note directly to the right of Middle C.
Next, place your three remaining right fingers on the next three white notes.
You should have all five of your right fingers resting on a white key with your thumb starting on Middle C. Be sure your wrist is up and your fingers are curved.
If you did this correctly your hand position should resemble mine in the example above.
For this beginner lesson for piano, we will call this hand position: “Position Number 1” or “Middle C Position” (as it is commonly known) because our right number 1 finger is starting at Middle C.
Chalkboard Assignment
Now keep each finger glued to its’ properly assigned key and play the following numbered pattern one finger at a time:
Be sure not to press more than one note down at a time. Release each note before pressing the next one down. Keep your hand position steady and in one place.
Don’t change the position of your hand or rock back and forth as you play each key. Your fingers are doing all the work here, not your hand.
Some beginners may have trouble with the 3rd and 4th fingers (the middle and the ring fingers), because these fingers are not usually accustomed to working independently of each other.
For this beginner lesson for piano, pay special attention to fingers 3 and 4 as you play them. Notice if you have enough individual control over these two fingers so that they don’t press down at the same time (even for just an instant).
Legato
Again, our goal here in this beginner lesson for piano is to play a simple, smooth and evenly sounding finger pattern. We don’t need thunderous applause at this point.
Each note should be played slowly and evenly connected without any space or pause in between them.
Also the amount of force used to press down on each note should be equal for all five notes, thereby producing the same volume level for each note.
Play this exercise slowly as many times as needed until you can play it perfectly.
Then when you feel you’re getting the hang of it, increase your speed, but keep playing the notes smoothly, accurately and evenly.
From these images, notice how my hand position stays the same as I play all 5 notes.
Music Terminology:
Whenever you play a group of notes in such an even and steady fashion, (one after the other) with no breaks in between, we call this playing style “legato” in music theory.
You don’t need to memorize the musical jargon at this point. I just thought I’d mention that now, because you will hear the term “legato” again in future beginner lessons for piano.
Still have questions about this legato exercise?
Click the “Play” Button on this Video
and let me show you how it’s done…
Staccato
Okay, now we are going to alter our playing style just a bit. One great way to force your fingers to work independently of one another is to play them suddenly, and one at a time.
For this exercise, we’ll play the same 5-finger pattern as in the first example for our beginner lesson for piano. However, this time we will leave a noticeable pause in between each note as we play them.
Play the notes as though you are quickly striking or stabbing into the keys and quickly retracting your finger upwards after each strike.
Not loudly mind you… just play it with short, controlled bursts. Remember to keep each finger glued to its’ properly assigned key as you go, and try not to tense up. Stay relaxed.
Play this exercise slowly and as many times as needed until you can play each note perfectly individually. When you feel you have got the hang of it, increase your speed while trying to maintain the same level of control.
Music Terminology:
When we play a group of notes with a noticeable break or space in between them, this is known as a “staccato” playing style in music theory.
Again, you don’t need to memorize this right now. But you will hear the term “staccato” later in future beginner lessons for piano.
For the staccato part of our beginner lesson for piano, it’s okay to slightly bounce your hand up and down as you play the keys faster.
Just be sure you’re bouncing from the wrist and not the forearm. Putting a slight bounce in your hand will give you more leverage to strike down on and pull back off the keys at faster speeds.
Sure, I know you’d rather see ME do it instead, so…
Check this Video Out and Watch Me Demonstrate
How to Play these Staccato Fingering Exercises!
Welcome to Your First Beginner Lesson for Piano!
Welcome to Get Piano Lesson 1. Since this will be our first beginner lesson for piano, these initial finger exercises will be relatively simple and not too dramatic.
The goal here is not to look fancy or sound like Billy Joel right away.
The object of this lesson is to focus on keeping good form in your hands, wrists and fingers, and playing the following exercises correctly.
Check Out this Video and Watch Me Demonstrate a Basic Introduction to the Piano!
Now, if you’ve already read through my “Piano Pattern” and “Get Ready” sections, I want to thank you for being patient this long, but now we’re going to have some fun!
So without further delay, take a comfortable seat in front of your piano keyboard, and we will begin our beginner lesson for piano right now…
Right Hand
Remember that good friend of ours Middle C?
Good, place your right number 1 finger on Middle C.
What’s that? …you’ve already forgotten which finger is number 1?
Okay, I’ll remind you this time… your number 1 finger is your thumb (make sure you use your right thumb).
Got your thumb on Middle C? Good, now place your right index finger (number 2) on the white note directly to the right of Middle C.
Next, place your three remaining right fingers on the next three white notes.
You should have all five of your right fingers resting on a white key with your thumb starting on Middle C. Be sure your wrist is up and your fingers are curved.
If you did this correctly your hand position should resemble mine in the example above.
For this beginner lesson for piano, we will call this hand position: “Position Number 1” or “Middle C Position” (as it is commonly known) because our right number 1 finger is starting at Middle C.
Chalkboard Assignment
Now keep each finger glued to its’ properly assigned key and play the following numbered pattern one finger at a time:
Be sure not to press more than one note down at a time. Release each note before pressing the next one down. Keep your hand position steady and in one place.
Don’t change the position of your hand or rock back and forth as you play each key. Your fingers are doing all the work here, not your hand.
Some beginners may have trouble with the 3rd and 4th fingers (the middle and the ring fingers), because these fingers are not usually accustomed to working independently of each other.
For this beginner lesson for piano, pay special attention to fingers 3 and 4 as you play them. Notice if you have enough individual control over these two fingers so that they don’t press down at the same time (even for just an instant).
Legato
Again, our goal here in this beginner lesson for piano is to play a simple, smooth and evenly sounding finger pattern. We don’t need thunderous applause at this point.
Each note should be played slowly and evenly connected without any space or pause in between them.
Also the amount of force used to press down on each note should be equal for all five notes, thereby producing the same volume level for each note.
Play this exercise slowly as many times as needed until you can play it perfectly.
Then when you feel you’re getting the hang of it, increase your speed, but keep playing the notes smoothly, accurately and evenly.
From these images, notice how my hand position stays the same as I play all 5 notes.
Music Terminology:
Whenever you play a group of notes in such an even and steady fashion, (one after the other) with no breaks in between, we call this playing style “legato” in music theory.
You don’t need to memorize the musical jargon at this point. I just thought I’d mention that now, because you will hear the term “legato” again in future beginner lessons for piano.
Still have questions about this legato exercise?
Click the “Play” Button on this Video and let me show you how it’s done!
Staccato
Okay, now we are going to alter our playing style just a bit. One great way to force your fingers to work independently of one another is to play them suddenly, and one at a time.
For this exercise, we’ll play the same 5-finger pattern as in the first example for our beginner lesson for piano. However, this time we will leave a noticeable pause in between each note as we play them.
Play the notes as though you are quickly striking or stabbing into the keys and quickly retracting your finger upwards after each strike.
Not loudly mind you… just play it with short, controlled bursts. Remember to keep each finger glued to its’ properly assigned key as you go, and try not to tense up. Stay relaxed.
Play this exercise slowly and as many times as needed until you can play each note perfectly individually. When you feel you have got the hang of it, increase your speed while trying to maintain the same level of control.
Music Terminology:
When we play a group of notes with a noticeable break or space in between them, this is known as a “staccato” playing style in music theory.
Again, you don’t need to memorize this right now. But you will hear the term “staccato” later in future beginner lessons for piano.
For the staccato part of our beginner lesson for piano, it’s okay to slightly bounce your hand up and down as you play the keys faster.
Just be sure you’re bouncing from the wrist and not the forearm. Putting a slight bounce in your hand will give you more leverage to strike down on and pull back off the keys at faster speeds.
Sure, I know you’d rather see ME do it instead of just reading about, so…
Check this Video Out and Watch Me Demonstrate How to Play these Staccato Fingering Exercises!