How to Get Ready for Your
Free Beginner Piano Lessons
Welcome to your first of several free beginner piano lessons!
 Before we actually start tickling the ivories, there are some important facts about the piano we need to discuss.
These free and easy piano lessons will cover:
1) Different types of piano keyboards
2) Your position at the keyboard
3) The importance of proper fingering
4) Your first five piano notes
Choosing a Piano Keyboard
By the way… what type of keyboard instrument are you using?
 In today’s technological age, there are so many amazing electronic and digital piano keyboards to choose from!
However, not all of them are suitable for your free beginner piano lessons.
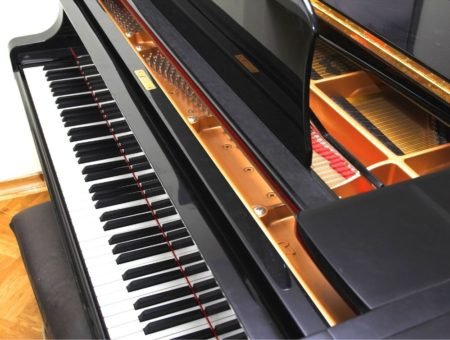
Of course, you just can’t beat a genuine wooden-key and strings acoustic piano.
Whether it’s an upright or a grand, to a piano player, nothing feels or sounds better than the real thing.
But now in the 21st century, with space being so limited and budgets so tight, it’s more likely you already own or were thinking about going digital. And that’s fine too.
However, I will insist you make sure your piano keyboard has three essential features:
Full Size Keys
 Make sure you’re using “full-size” keys to practice on. This means that the keys on your piano instrument conform to the standard size of true piano keys.
This sounds laughable, but you’d be surprised at how many people I’ve seen trying to practice their easy piano lessons on “baby keys”.
So, I can’t say this enough… you’ll never get the feel for real piano playing using a miniature toy to practice on.
Actually, these next two features are not quite as imperative, but they can only help to enhance your free beginner piano lessons.
Weighted Keys
Use a piano keyboard with “weighted key action”. What’s that? Weighted keys are the digital piano’s simulated answer to what it actually feels like to play a real piano.
 The mechanics of how a piano works requires your fingers to apply a certain amount of pressure in order to produce sound.
On a genuine wooden-key piano, the physical act of pressing down on wood provides a certain level of resistance for your fingers. Also, the keys are not the only moving parts responsible for the mechanics of how a piano works.
Each time you play the wooden key of a piano, another wooden piece called “a hammer” strikes a specific point on an intricate mesh of metallic strings, thereby producing your tone.
There is still another component to how a piano works called a “damper”, which rises above the ringing strings and sustains your tone as long as you hold the piano key in the downward position.
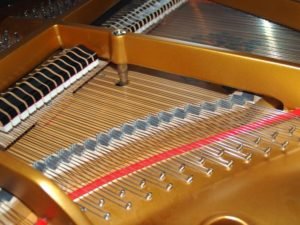 After you release the wooden piano key, the damper falls back into place and stops the strings from vibrating (and thereby stops your tone).
Your fingers need to become accustomed to the subtle pressures involved with this pressing and holding action in order to develop proper endurance, speed, accuracy and a feel for velocity or “touch” sensitivity on the piano keyboard.
This won’t be possible with flimsy plastic keys.
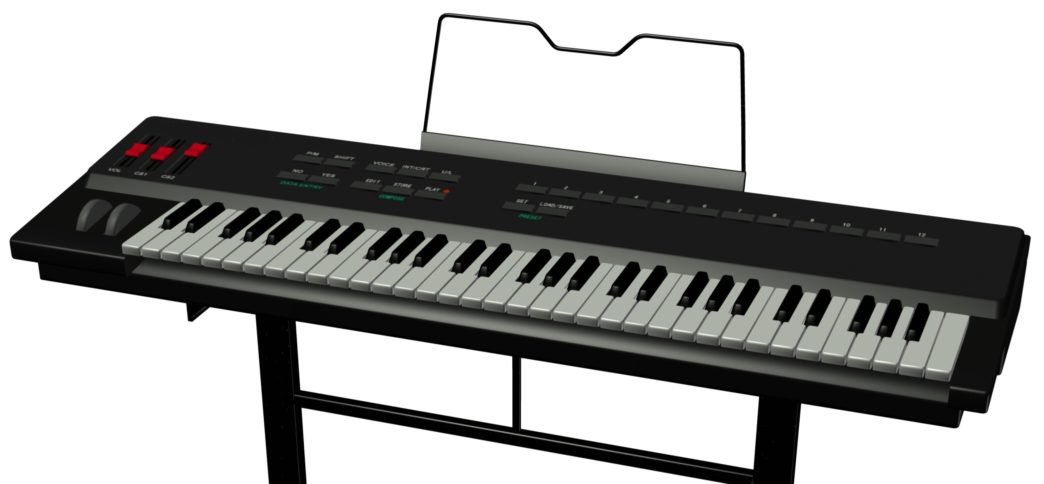
61-Note Keyboard
Use a piano keyboard with a minimum of 61 total keys (as shown in this piano diagram). That adds up to 36 white keys and 25 black keys.
As you advance beyond your free beginner piano lessons you will find music pieces written with a wider range of pitch, requiring you to spread you hands further out amongst the keyboard. Therefore it doesn’t make sense to limit yourself in the beginning by purchasing a smaller range piano keyboard.
Again, these are just my suggestions. After all, in my early days I learned how to play piano fairly well from just a cheap 49-note plastic Casio.
However, if you will be practicing with plastic keys on a regular basis, just be sure to find a real piano every once in awhile to practice your free beginner piano lessons on.
Trust me, you’ll notice the difference in the added finger resistance immediately. Your fingers may even start to fatigue easily as you begin practicing your easy piano lessons on a real piano if your fingers were originally trained on plastic.
Your Position at the Piano
As you get more experienced at playing the piano, the way you sit or stand at your keyboard will largely depend on your own personal preference and comfort level.
 Although there are still some basic guidelines you can follow if you’re just starting your free beginner piano lessons.
Sit or Stand?
The sitting position is the most famous and definitely the most effective way to practice your free beginner piano lessons. Sitting gives you the leverage to control your hands and fingers most effectively.
However, the majority of electronic keyboardists (especially those who play in pop or rock bands) will usually find themselves in a standing position more often.
Keyboard Height
Whether you are sitting or standing, you should always make sure your keyboard height is not above the level of your elbows.
You should be able to comfortably rest your fingers on the keyboard while keeping both your arms in a horizontal position. If your keyboard is too high, you’ll have to bend your wrists upward in order to play.
This will defeat the purpose of your easy piano lessons, and eventually cause unnecessary tension in your shoulders, wrists and back over the course of long practice (or performance) sessions.
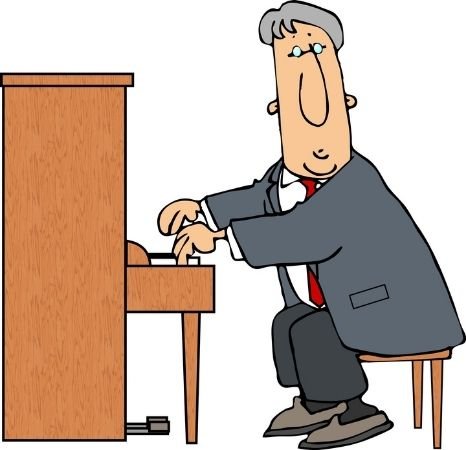
Sitting Position
 If you’re sitting, sit tall! Lean forward just a little bit, but don’t slouch forward.
On a real piano, your knees should line up slightly underneath the piano keyboard with your feet firmly on the floor for leverage and support.
One foot can be placed slightly forward to reach the pedals.
This image shows the ideal playing position to be in as you practice your free beginner piano lessons.
What Makes a Good Piano Player?
 During our first set of free piano online lessons, we’ll address that question by focusing on a series of progressive finger patterns and chord exercises.
Good piano playing starts with good posture at the keyboard by maintaining a comfortable seated position and proper form in your arms, wrists and hands.
This provides your fingers with the leverage they need to: strike, grasp, duck under, slip, reach over, stretch, pull and push off the piano keys with just the right amount of control and support.
In Get Piano Lesson 1, we’ll begin to develop these techniques in our first interactive beginner lessons. For piano players, the ability to move as gracefully as a butterfly on the keyboard is what good piano playing is all about.
When you can play even a simple tune on the piano easily, beautifully, and without mistakes… then you will be a good piano player. That’s all it takes!
The Importance of Proper Fingering
In order to play the piano accurately and smoothly it’s essential to develop good fingering.
A good piano player knows how to reach any sequence of notes up to an eight to ten note distance on the piano keyboard without bending, twisting at the wrist, or jumping from note to note.
 Good fingering ensures a smooth transition from one note to the next and allows for the proper leverage to play soft, loud, fast or slow without exerting too much physical energy.
In fact, you will hardly ever see professional piano players unnecessarily moving their hands around too much at all. It’s their fingers that are doing all the reaching, stretching and sliding under and over other fingers with just the right dexterity.
Therefore, in order to develop this agile feel for the keyboard, we begin to train our fingers by assigning each finger a number. Then after a few easy piano lessons of playing numbered finger patterns, you will start to notice the exercises becoming increasingly easier to play.
In fact, our third set of free piano online lessons will utilize this “numbered fingering system” to play five different finger patterns from our online blackboard (similar to the one seen below).
These five easy piano lessons will teach us the basics of sight-reading without the need to learn note reading. We’ll also get other exciting free piano online lessons as well.
Numbering Your Fingers
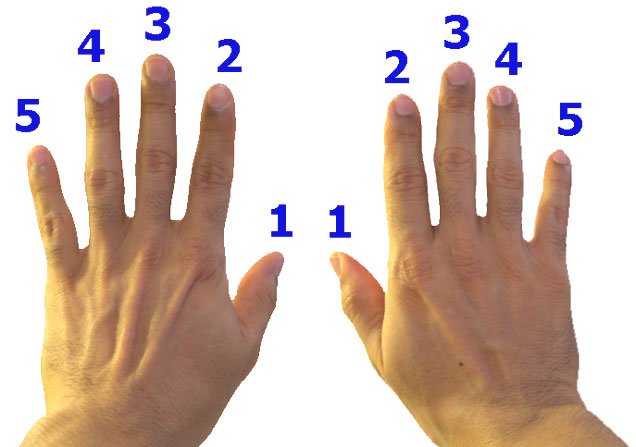
Let’s assign the same number to each corresponding finger on both our right and left hands
(I hope you can read my handwriting)
 In our seventh set of free piano online lessons we will slowly begin playing our keyboard with both hands simultaneously.
These challenging set of exercises will teach us hand-eye coordination, ambidexterity and other beginner lessons for piano. These ambidextrous exercises will be presented in five easy piano lessons, and will conclude with a piano test.
Hand Position
 Part of good fingering also has to do with how you place your hands on the keyboard. As a piano player, you should be able to move seamlessly over the keys without tripping over the keys or even your own fingers.
The black keys (as you may have noticed) are raised a bit higher than the white keys. So your hand position must also be at a raised level where you can glide over the white as well as black keys.
In future free piano online lessons we will begin to break out of our comfort zone by moving beyond our familiar C Major position (first position).
These progressive beginner lessons for piano will have us playing finger patterns in the 2nd, 3rd and 4th positions, as well as three other easy hand positions.
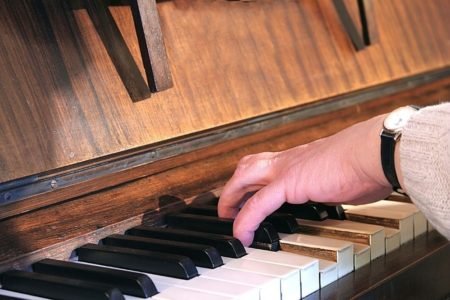
Poor Hand Position
If you were to ask someone with little or no piano experience to play three or four notes on the piano, you would probably observe their hand lying flat over the keys (as in this image), with possibly even their palm touching the white keys.
You won’t get very far trying to play piano in this position, because there’s absolutely no leverage or control over the keys with such poor form.
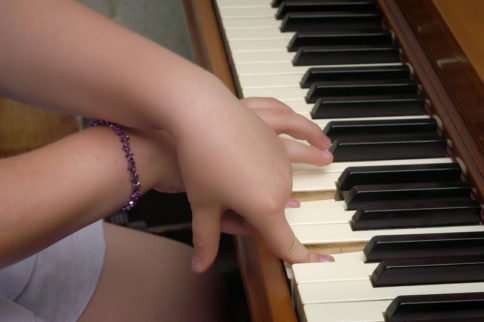
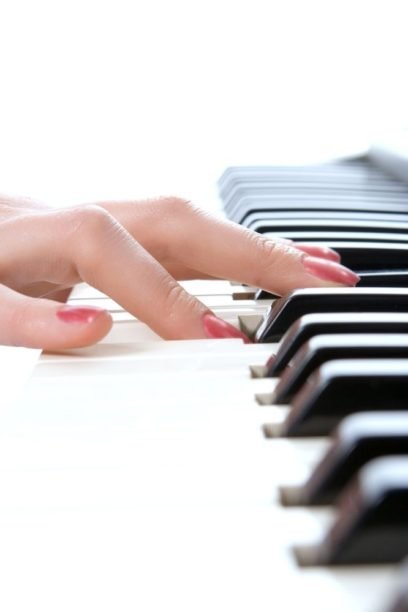
Good Hand Position
You need to keep your wrists up, but in-line with your forearms. Your forearms should be in a comfortable horizontal position. Shoulders relaxed.
Your fingers should be curved and ready to strike down on the keys with only the tips of your fingers touching them.
 Your palm should be in a “cupped” shape, as if you were holding a small ball in your hand.
In this position your thumb will line up with its’ side touching the keys. The gap under your four fingers allows easy access for your thumb to pass underneath, but also allows your index and middle fingers to pass easily over your thumb.
The image above shows the ideal hand position as you practice your free piano online lessons.
Going forward, our free piano online lessons will introduce us to chords and have us playing 1-3-5 triads in seven chord positions on the keyboard.
Beyond that, Get Piano Lesson.com will continue to focus primarily on easy piano lessons before venturing into the more advanced musical topics, such as: note reading, time signatures, scales and other complex topics of music theory.
However, all our free piano online lessons are designed to be comprehensive, interactive and fun!
How to Get Ready for Your
Free Beginner Piano Lessons
Welcome to your first of several free beginner piano lessons!
Before we actually start tickling the ivories, there are some important facts about the piano we need to discuss.
These free and easy piano lessons will cover:
1) Different types of piano keyboards
2) Your position at the keyboard
3) The importance of proper fingering
4) Your first five piano notes
Choosing a Piano Keyboard
By the way… what type of keyboard instrument are you using?
In today’s technological age, there are so many amazing electronic and digital piano keyboards to choose from!
However, not all of them are suitable for your free beginner piano lessons.
Of course, you just can’t beat a genuine wooden-key and strings acoustic piano.
Whether it’s an upright or a grand, to a piano player, nothing feels or sounds better than the real thing.
But now in the 21st century, with space being so limited and budgets so tight, it’s more likely you already own or were thinking about going digital. And that’s fine too.
However, I will insist you make sure your piano
keyboard has three essential features:
Full Size Keys
Make sure you’re using “full-size” keys to practice on. This means that the keys on your piano instrument conform to the standard size of true piano keys.
This sounds laughable, but you’d be surprised at how many people I’ve seen trying to practice their easy piano lessons on “baby keys”.
So, I can’t say this enough… you’ll never get the feel for real piano playing using a miniature toy to practice on.
Actually, these next two features are not quite as imperative, but they can only help to enhance your free beginner piano lessons.
Weighted Keys
Use a piano keyboard with “weighted key action”. What’s that? Weighted keys are the digital piano’s simulated answer to what it actually feels like to play a real piano.
The mechanics of how a piano works requires your fingers to apply a certain amount of pressure in order to produce sound.
On a genuine wooden-key piano, the physical act of pressing down on wood provides a certain level of resistance for your fingers. Also, the keys are not the only moving parts responsible for the mechanics of how a piano works.
Each time you play the wooden key of a piano, another wooden piece called “a hammer” strikes a specific point on an intricate mesh of metallic strings, thereby producing your tone.
There is still another component to how a piano works called a “damper”, which rises above the ringing strings and sustains your tone as long as you hold the piano key in the downward position.
After you release the wooden piano key, the damper falls back into place and stops the strings from vibrating (and thereby stops your tone).
Your fingers need to become accustomed to the subtle pressures involved with this pressing and holding action in order to develop proper endurance, speed, accuracy and a feel for velocity or “touch” sensitivity on the piano keyboard.
This won’t be possible with flimsy plastic keys.
61-Note Keyboard
Use a piano keyboard with a minimum of 61 total keys (as shown in this piano diagram). That adds up to 36 white keys and 25 black keys.
As you advance beyond your free beginner piano lessons you will find music pieces written with a wider range of pitch, requiring you to spread you hands further out amongst the keyboard. Therefore it doesn’t make sense to limit yourself in the beginning by purchasing a smaller range piano keyboard.
Again, these are just my suggestions. After all, in my early days I learned how to play piano fairly well from just a cheap 49-note plastic Casio.
However, if you will be practicing with plastic keys on a regular basis, just be sure to find a real piano every once in awhile to practice your free beginner piano lessons on.
Trust me, you’ll notice the difference in the added finger resistance immediately. Your fingers may even start to fatigue easily as you begin practicing your easy piano lessons on a real piano if your fingers were originally trained on plastic.
Your Position at the Piano
As you get more experienced at playing the piano, the way you sit or stand at your keyboard will largely depend on your own personal preference and comfort level.
Although there are still some basic guidelines you can follow if you’re just starting your free beginner piano lessons.
Sit or Stand?
The sitting position is the most famous and definitely the most effective way to practice your free beginner piano lessons. Sitting gives you the leverage to control your hands and fingers most effectively.
However, the majority of electronic keyboardists (especially those who play in pop or rock bands) will usually find themselves in a standing position more often.
Keyboard Height
Whether you are sitting or standing, you should always make sure your keyboard height is not above the level of your elbows.
You should be able to comfortably rest your fingers on the keyboard while keeping both your arms in a horizontal position. If your keyboard is too high, you’ll have to bend your wrists upward in order to play.
This will defeat the purpose of your easy piano lessons, and eventually cause unnecessary tension in your shoulders, wrists and back over the course of long practice (or performance) sessions.
Sitting Position
If you’re sitting, sit tall! Lean forward just a little bit, but don’t slouch forward.
On a real piano, your knees should line up slightly underneath the piano keyboard with your feet firmly on the floor for leverage and support.

One foot can be placed slightly forward to reach the pedals.
This image shows the ideal playing position to be in as you practice your free beginner piano lessons.
What Makes a Good Piano Player?
During our first set of free piano online lessons, we’ll address that question by focusing on a series of progressive finger patterns and chord exercises.
Good piano playing starts with good posture at the keyboard by maintaining a comfortable seated position and proper form in your arms, wrists and hands.
This provides your fingers with the leverage they need to: strike, grasp, duck under, slip, reach over, stretch, pull and push off the piano keys with just the right amount of control and support.
In Get Piano Lesson 1, we’ll begin to develop these techniques in our first interactive beginner lessons. For piano players, the ability to move as gracefully as a butterfly on the keyboard is what good piano playing is all about.
When you can play even a simple tune on the piano easily, beautifully, and without mistakes… then you will be a good piano player. That’s all it takes!
The Importance of Proper Fingering
In order to play the piano accurately and smoothly it’s essential to develop good fingering.
A good piano player knows how to reach any sequence of notes up to an eight to ten note distance on the piano keyboard without bending, twisting at the wrist, or jumping from note to note.
Good fingering ensures a smooth transition from one note to the next and allows for the proper leverage to play soft, loud, fast or slow without exerting too much physical energy.
In fact, you will hardly ever see professional piano players unnecessarily moving their hands around too much at all. It’s their fingers that are doing all the reaching, stretching and sliding under and over other fingers with just the right dexterity.
Therefore, in order to develop this agile feel for the keyboard, we begin to train our fingers by assigning each finger a number. Then after a few easy piano lessons of playing numbered finger patterns, you will start to notice the exercises becoming increasingly easier to play.
In fact, our third set of free piano online lessons will utilize this “numbered fingering system” to play five different finger patterns from our online blackboard (similar to the one seen below).
These five easy piano lessons will teach us the basics of sight-reading without the need to learn note reading. We’ll also get other exciting free piano online lessons as well.
Numbering Your Fingers
Let’s assign the same number to each corresponding
finger on both our right and left hands
(I hope you can read my handwriting)
In our seventh set of free piano online lessons we will slowly begin playing our keyboard with both hands simultaneously.
These challenging set of exercises will teach us hand-eye coordination, ambidexterity and other beginner lessons for piano. These ambidextrous exercises will be presented in five easy piano lessons, and will conclude with a piano test.
Hand Position
Part of good fingering also has to do with how you place your hands on the keyboard. As a piano player, you should be able to move seamlessly over the keys without tripping over the keys or even your own fingers.
 The black keys (as you may have noticed) are raised a bit higher than the white keys. So your hand position must also be at a raised level where you can glide over the white as well as black keys.
In future free piano online lessons we will begin to break out of our comfort zone by moving beyond our familiar C Major position (first position).
These progressive beginner lessons for piano will have us playing finger patterns in the 2nd, 3rd and 4th positions, as well as three other easy hand positions.
Poor Hand Position
If you were to ask someone with little or no piano experience to play three or four notes on the piano, you would probably observe their hand lying flat over the keys (as in this image), with possibly even their palm touching the white keys.
You won’t get very far trying to play piano in this position, because there’s absolutely no leverage or control over the keys with such poor form.
Good Hand Position
You need to keep your wrists up, but in-line with your forearms. Your forearms should be in a comfortable horizontal position. Shoulders relaxed.
Your fingers should be curved and ready to strike down on the keys with only the tips of your fingers touching them.
 Your palm should be in a “cupped” shape, as if you were holding a small ball in your hand.
In this position your thumb will line up with its’ side touching the keys. The gap under your four fingers allows easy access for your thumb to pass underneath, but also allows your index and middle fingers to pass easily over your thumb.
The image above shows the ideal hand position as you practice your free piano online lessons.
Going forward, our free piano online lessons will introduce us to chords and have us playing 1-3-5 triads in seven chord positions on the keyboard.
Beyond that, Get Piano Lesson.com will continue to focus primarily on easy piano lessons before venturing into the more advanced musical topics, such as: note reading, time signatures, scales and other complex topics of music theory.
However, all our free piano online lessons are designed to be comprehensive, interactive and fun!
How to Get Ready for Your
Free Beginner Piano Lessons
Welcome to your first of several
free beginner piano lessons!
Before we actually start tickling the ivories, there are some important facts about the piano we need to discuss.
These free and easy piano lessons will cover:
1) Different types of piano keyboards
2) Your position at the keyboard
3) The importance of proper fingering
4) Your first five piano notes
Choosing a Piano Keyboard
By the way… what type of keyboard instrument are you using?
In today’s technological age, there are so many amazing electronic and digital piano keyboards to choose from!
However, not all of them are suitable for your free beginner piano lessons.
Of course, you just can’t beat a genuine wooden-key and strings acoustic piano.
Whether it’s an upright or a grand, to a piano player, nothing feels or sounds better than the real thing.
But now in the 21st century, with space being so limited and budgets so tight, it’s more likely you already own or were thinking about going digital… and that’s fine too.
But, I will insist you make sure your piano keyboard has three essential features:
Full Size Keys
Make sure you’re using “full-size” keys to practice on. This means that the keys on your piano instrument conform to the standard size of true piano keys.
This sounds laughable, but you’d be surprised at how many people I’ve seen trying to practice their easy piano lessons on “baby keys”.
So, I can’t say this enough… you’ll never get the feel for real piano playing using a miniature toy to practice on.
Actually, these next two features are not quite as imperative, but they can only help to enhance your free beginner piano lessons.
Weighted Keys
Use a piano keyboard with “weighted key action”. What’s that? Weighted keys are the digital piano’s simulated answer to what it actually feels like to play a real piano.
The mechanics of how a piano works requires your fingers to apply a certain amount of pressure in order to produce sound.
On a genuine wooden-key piano, the physical act of pressing down on wood provides a certain level of resistance for your fingers. Also, the keys are not the only moving parts responsible for the mechanics of how a piano works.
Each time you play the wooden key of a piano, another wooden piece called “a hammer” strikes a specific point on an intricate mesh of metallic strings, thereby producing your tone.
There is still another component to how a piano works called a “damper”, which rises above the ringing strings and sustains your tone as long as you hold the piano key in the downward position.

After you release the wooden piano key, the damper falls back into place and stops the strings from vibrating (and thereby stops your tone).
Your fingers need to become accustomed to the subtle pressures involved with this pressing and holding action in order to develop proper endurance, speed, accuracy and a feel for velocity or “touch” sensitivity on the piano keyboard.
This won’t be possible with flimsy plastic keys.
61-Note Keyboard
Use a piano keyboard with a minimum of 61 total keys (as shown in this piano diagram). That adds up to 36 white keys and 25 black keys.
As you advance beyond your free beginner piano lessons you will find music pieces written with a wider range of pitch, requiring you to spread you hands further out amongst the keyboard.
Therefore it doesn’t make sense to limit yourself in the beginning by purchasing a smaller range piano keyboard.
Again, these are just my suggestions. After all, in my early days I learned how to play piano fairly well from just a cheap 49-note plastic Casio.
However, if you will be practicing with plastic keys on a regular basis, just be sure to find a real piano every once in awhile to practice your free beginner piano lessons on.
Trust me, you’ll notice the difference in the added finger resistance immediately.
Your fingers may even start to fatigue easily as you begin practicing your easy piano lessons on a real piano if your fingers were originally trained on plastic.
Your Position at the Piano
As you get more experienced at playing the piano, the way you sit or stand at your keyboard will largely depend on your own personal preference and comfort level.
Although there are still some basic guidelines you can follow if you’re just starting your free beginner piano lessons.
Sit or Stand?
The sitting position is the most famous and definitely the most effective way to practice your free beginner piano lessons. Sitting gives you the leverage to control your hands and fingers most effectively.
However, the majority of electronic keyboardists (especially those who play in pop or rock bands) will usually find themselves in a standing position more often.
Keyboard Height
Whether you are sitting or standing, you should always make sure your keyboard height is not above the level of your elbows.
You should be able to comfortably rest your fingers on the keyboard while keeping both your arms in a horizontal position. If your keyboard is too high, you’ll have to bend your wrists upward in order to play.
This will defeat the purpose of your easy piano lessons, and eventually cause unnecessary tension in your shoulders, wrists and back over the course of long practice (or performance) sessions.
Sitting Position
If you’re sitting, sit tall! Lean forward just a little bit, but don’t slouch forward.
On a real piano, your knees should line up slightly underneath the piano keyboard with your feet firmly on the floor for leverage and support.
One foot can be placed slightly forward to reach the pedals.
This image shows the ideal playing position to be in as you practice your free beginner piano lessons.
What Makes a Good Piano Player?
During our first set of free piano online lessons, we’ll address that question by focusing on a series of progressive finger patterns and chord exercises.
Good piano playing starts with good posture at the keyboard by maintaining a comfortable seated position and proper form in your arms, wrists and hands.
This provides your fingers with the leverage they need to: strike, grasp, duck under, slip, reach over, stretch, pull and push off the piano keys with just the right amount of control and support.
In Get Piano Lesson 1, we’ll begin to develop these techniques in our first interactive beginner lessons. For piano players, the ability to move as gracefully as a butterfly on the keyboard is what good piano playing is all about.
When you can play even a simple tune on the piano easily, beautifully, and without mistakes… then you will be a good piano player. That’s all it takes!
The Importance of Proper Fingering
In order to play the piano accurately and smoothly it’s essential to develop good fingering.
A good piano player knows how to reach any sequence of notes up to an eight to ten note distance on the piano keyboard without bending, twisting at the wrist, or jumping from note to note.
Good fingering ensures a smooth transition from one note to the next and allows for the proper leverage to play soft, loud, fast or slow without exerting too much physical energy.
In fact, you will hardly ever see professional piano players unnecessarily moving their hands around too much at all. It’s their fingers that are doing all the reaching, stretching and sliding under and over other fingers with just the right dexterity.
Therefore, in order to develop this agile feel for the keyboard, we begin to train our fingers by assigning each finger a number. Then after a few easy piano lessons of playing numbered finger patterns, you will start to notice the exercises becoming increasingly easier to play.
In fact, our third set of free piano online lessons will utilize this “numbered fingering system” to play five different finger patterns from our online blackboard (similar to the one seen below).
These five easy piano lessons will teach us the basics of sight-reading without the need to learn note reading. We’ll also get other exciting free piano online lessons as well.
Numbering Your Fingers
Let’s assign the same numbers to the corresponding fingers of each hand
(I hope you can read my handwriting)
In our seventh set of free piano online lessons we will slowly begin playing our keyboard with both hands simultaneously.
These challenging set of exercises will teach us hand-eye coordination, ambidexterity and other beginner lessons for piano. These ambidextrous exercises will be presented in five easy piano lessons, and will conclude with a piano test.
Hand Position
Part of good fingering also has to do with how you place your hands on the keyboard.
As a piano player, you should be able to move seamlessly over the keys without tripping over the keys or even your own fingers.
The black keys (as you may have noticed) are raised a bit higher than the white keys. So your hand position must also be at a raised level where you can glide over the white as well as black keys.
In upcoming free piano online lessons we will begin to break out of our comfort zone by moving beyond our familiar C Major position (first position).
These progressive beginner lessons for piano will have us playing finger patterns in the 2nd, 3rd and 4th positions, as well as three other easy hand positions.
Poor Hand Position
If you were to ask someone with little or no piano experience to play three or four notes on the piano, you would probably observe their hand lying flat over the keys (as in this image), with possibly even their palm touching the white keys.
You won’t get very far trying to play piano in this position, because there’s absolutely no leverage or control over the keys with such poor form.
Good Hand Position
You need to keep your wrists up, but in-line with your forearms. Your forearms should be in a comfortable horizontal position. Shoulders relaxed.
Your fingers should be curved and ready to strike down on the keys with only the tips of your fingers touching them.
Your palm should be in a “cupped” shape, as if you were holding a small ball in your hand.
In this position your thumb will line up with its’ side touching the keys. The gap under your four fingers allows easy access for your thumb to pass underneath, but also allows your index and middle fingers to pass easily over your thumb.
The image above shows the ideal hand position as you practice your free piano online lessons.
Going forward, our free piano online lessons will introduce us to chords and have us playing 1-3-5 triads in seven chord positions on the keyboard.
Beyond that, Get Piano Lesson.com will continue to focus primarily on easy piano lessons before venturing into the more advanced musical topics, such as: note reading, time signatures, scales and other complex topics of music theory.
However, all our free piano online lessons are designed to be comprehensive, interactive and fun!